Today we will discuss how you can find the distance of an object from the camera using python OpenCV. Check out the video below. Before we continue, you should know how to detect a colored object. Click this link to check out my previous blog on object detection and tracking.

I hope after checking out my previous blog, you are able to write your own code to detect and track objects. We will take forward the Object detection and tracking code to find the distance of an object from the camera. So let's start.
Let us first understand the principle using which we will find the distance of the object from the camera.
Principle:- As the object moves farther away from the camera, the Y-axis coordinate decreases.This simply means that, if your object is near to the camera, the Y-axis coordinate will be very large. As you move the object farther from the camera, the object will appear to move above in the image and thus decreasing the Y-axis coordinates proportionately.
Therefore, we will directly find the coordinates of the object and use the Y-axis coordinates for calibration. Following is the code which prints our x and y-axis coordinates onto the screen.
if len(contours) != 0:
    cnt = contours[0]
    area = cv2.contourArea(cnt)
    if(area >100):
        M = cv2.moments(cnt)
        Cx = int(M['m10']/M['m00'])
        Cy = int(M['m01'] / M['m00'])
        S = 'Location of object:' + '(' + str(Cx) + ',' + str(Cy) + ')'
    cv2.putText(frame, S, (5, 50), font, 2, (0, 0, 255), 2, cv2.LINE_AA)
    cv2.drawContours(frame, cnt, -1, (0, 255, 0), 3)
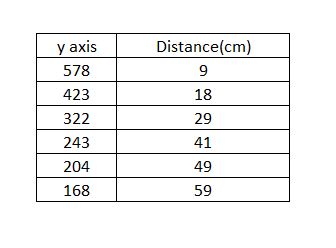
If you run the above code, the coordinated of the object will be printed on the screen. We can use these coordinates for calibration. Keep the object in front of the camera at some distance and note down the distance manually using a ruler and its corresponding Y-axis coordinate. Now move the object a little farther from the camera and repeat the above process. Do several iterations for different distances. Remember, a large number of data points will give you higher accuracy. The data will be something similar as shown below.

The next step is to plot this data on the x-y axis. The distance must be on Y-axis. Now find a trendline through these data points and find the equation of the trendline in excel. You can choose a linear, exponential or polynomial trendline depending upon which fits best with the data. The trendline which I got is shown below. Remember to check the display equation box in trendline settings. For me, the quadratic equation worked best.

Now the last part is to enter this equation in the code. The code will look similar to below.
if len(contours) != 0:
    cnt = contours[0]
    area = cv2.contourArea(cnt)
    if(area >100):
        M = cv2.moments(cnt)
        Cx = int(M['m10']/M['m00'])
        Cy = int(M['m01'] / M['m00'])
        distance = 0.0003 * (Cy ** (2)) - (0.3178 * Cy) + 103.53
    S = 'Distance Of Object: ' + str(distance)
    cv2.putText(frame, S, (5, 50), font, 2, (0, 0, 255), 2, cv2.LINE_AA)
    cv2.drawContours(frame, cnt, -1, (0, 255, 0), 3)
Run the code. This is it. Enjoy coding.
Check out full code here:- https://github.com/vibhor69meshram/Object-location-finding-method-2
Check out full code here:- https://github.com/vibhor69meshram/Object-location-finding-method-2
Comments
Post a Comment